John's Spring Run
Photos from my building a cedar strip kayak
Page 1 - Bits and
Pieces (you're here!)
Page 2 - Coming Together
Page 3 - Finishing Touches and Launching
I wanted to build a kayak that is stable enough for hands-off activities such as fishing, and to loan to non-kayaking friends who may join me paddling. I also wanted a kayak that would not have trouble keeping up with a typical group of touring kayakers. Most of all, I enjoy building kayaks.
The boat I chose to build is the Spring Run model, designed by Joe Greenley of Redfish Kayaks. This kayak is approximately 23 and 3/4 inches wide and I am building it to a 16 foot length. It should weigh a little approximately 40 pounds when completed.
Here's a profile view of the the boat, from the designer's web page:
This is the second strip-built boat. My first strip boat was a Guillemot, which I really enjoy paddling and playing in.
Here are some photos, mostly close-ups, of the building process. Click any photo to view a larger image.


The plans from Redfish Kayaks contain mold station templates that are traced onto wood. My mold forms were built from 1/2" plywood. I prefer plywood over the particle board because the plywood holds staples and screws better without splitting. |

The forms were strung on an internal 2" x 4" strongback beam.
|

Stems were laminated from 1/8" strips of cedar (internal stems) and mahogany (external stems), and glued with epoxy.
|

Strips were cut on a table saw outfitted with feather boards to hold the horizontal and vertical position for consistent cuts.
|

A lot of wood ends up as sawdust, which I add to the compost pile. The overnight wind sculpted the sawdust pile under the saw. |

The rough-cut strips are 3/4" by 1/4", and varied from 8 to 12 feet long. I cut more boards than I needed, so I could choose strips that color matched color and had the best grain. |

The strips from each board were bundled separately, so color-matching would be easier. The hull used three 2" x 6" boards 12 feet long. The deck used two boards, plus part of another for the cockpit recess. |

The bead and cove on each board were cut by mounting a hand-held router to the underside of a temporary table made from particle board. It took some time to get the blade position set correctly. Feather boards were essential to quickly making uniform cuts. |

At Home Depot, I found one light yellow, almost white, board of western red cedar (bottom of pic) so I just had to buy it. |
The internal stem was planed to a taper so the strips would lay flat against it. |

The hull strips were cut just proud of the internal stem. They will later be rasped and sanded flush with the internal stem so the external stem will lay neatly on top. |

This kayak is being built 90% stapleless, using a combination of temporary stapled strips, drywall screws into temporary wood blocks, hot melt glue, and masking tape. Duct tape and clamps helped on the hardest strips.
|
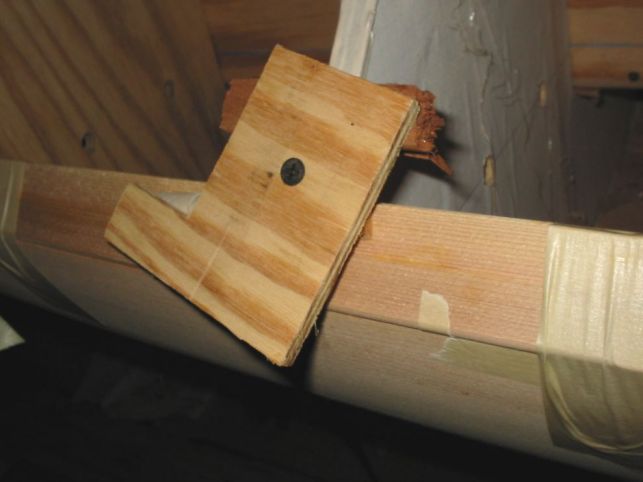
Drywalls screws forced some of the tougher strips into position until the hot melt glue would hold it. |

Stripping the bottom of the hull was accomplished by alternating strips that followed the shear line with strips following the center line. I laid strips "cove out" so that custom-fitting strip ends would be easier by making a bead on the strip being worked. |

I made rasps by gluing 60 grit paper onto scrap strips (center of photo). I found these rasps very useful when taking off just a little wood when fitting strip ends. |

Part of my deck on this kayak will be from the light color board I acquired. These wing nut clamps were effective in forcing strips onto the same plane. |

The boat really starts coming together on page 2.
Back to my home page.
Created July 8, 2003 by John Caldeira.