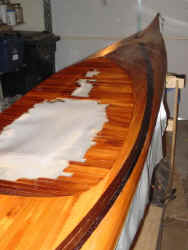
 Filling the Weave on the Hull
It took five coats of epoxy to fill the weave. I sanded lightly between the 2nd, 3rd and 4th coats.
(Click photos for a larger image)
 Filling the Weave on the Hull
It took five coats of epoxy to fill the weave. I sanded lightly
between the 2nd, 3rd and 4th coats.
In this photo, the deck can be seen stored below the hull, covered with plastic so it doesn't get epoxied right now.
It takes at least a day for the epoxy to firm enough to sand in this winter weather, so I've also been working on the hip plates and seat back. That is a big contrast to my earlier boat that was built in the summer heat, as I could apply two coats each day! At least the working time for the epoxy is longer in the winter. No bugs in winter, either.
When I built my stitch
and glue kayak last summer, bugs were attracted to the lights in the garage, and
end up stuck in the epoxy. There are several mosquitoes entombed in
the epoxy of that boat, like a bug in amber. I'm sure some of them bit me
before they died so my DNA is buried in that boat, allowing all sorts of Jurassic
Park-like possibilities should this boat be unearthed millennia from now.
 Sealing
& Glassing the Deck
The deck is the most visible part of the boat, and I am reasonably pleased
with the appearance after wetting out and applying the first epoxy coat to the
deck. There is one scratch and a few little glue lines, but that's okay by
me.

I plan to put on one fill coat each day, rolling it on and using a squeegie to smooth and thin the coat. If the weather is too cold, I'll have to go slower due to longer-curing epoxy time.
One of the worst glue lines shows at the bottom of the photo at left, as it contrasts with the dark wood.
Inside the Hull
 Having the hull off the
mold allows me to alternate between working on
the hull and deck while the other half cures.
I built a simple cradle from a few boards screwed into some bee hive boxes with drywall screws. The extra wood is now stored below the strongback with the deck on it.
To prepare the inside surface of the hull for fiberglass, I scraped it with a sharpened paint scraper, planed just a little, and sanded with 60 grit on the orbital sander.
 I left plenty of glue lines, but as
long as the glass can lay flat I'm happy. Not may folks will peak inside
the hatches with a flashlight.
 The
bow and stern internal stems needed rounded fillets so the glass would lay down
nicely. I also filled cracks between
strips with epoxy thickened with wood floor and mixed with microspheres, then
reinforced with a strip of bias-cut fiberglass.
The bias-cut fiberglass conforms better to curves than fiberglass tape, and fewer loose threads make it easier to work when cut.
When the deck or hull are off the mold, I'm using spreader sticks to keep the proper beam. This will help ensure that the two halves fit together like two halves of a clam shell - from the SAME clam.
 I
made little end-pours now, while the exact shape could be managed, and I could
see exactly where to cut holes for grab loops. I still may pour a little
when the boat is together to join the halves, or simply slather the ends in
thickened epoxy before taping the halves together.
A piece of a plastic milk jug made an excellent dam (I also use milk jug parts as mini-spatulas to apply epoxy). The fill material was epoxy mixed with microballoons and sanding dust.
Outfitting Plans
I ordered Yakima footbraces from Chesapeake
Light Craft and surface-mount bolts from Newfound
Woodworks to avoid holes in the side of the cockpit. Originally, I
intended only to use foam blocks as footrests but the adjustable footbraces will
make it easier for other paddlers.
My seat and bulkheads will be all foam, from Redfish Kayak. Redfish is also where I found inspiring deck designs.
Next Steps
1. More epoxy coats on the outside of the deck until the weave is completely buried.
2. Cut & cockpit hole and build cockpit combing.
Created: January 12, 2003