John's Night Heron
Page 3: Cockpit and Hatches
Click any photo to view a larger image.
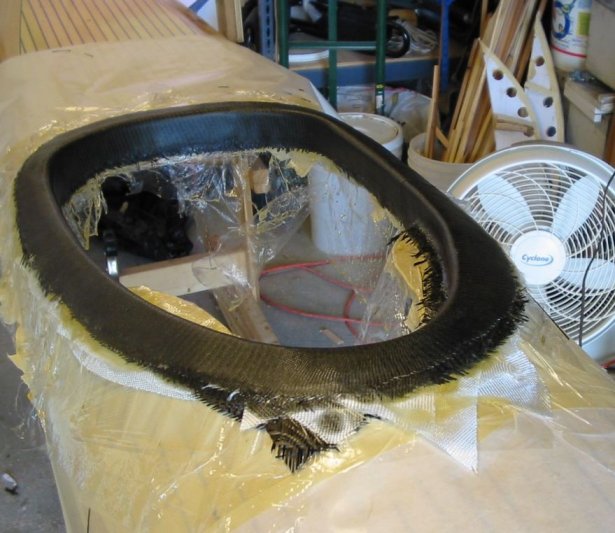
Coaming |

The rim has been sanded, the underside
deck fiberglass has been attached to the coaming, and carbon is being
added to the thigh braces. Later, more skim coats of epoxy to fair the whole thing. |
 Hatches
|
 To build a composite rim to hold the hatch, the hatch is temporarily reattached to the deck. Hot melt glue, sticks and tape work together well to hold the hatch in exactly the right position. Hot melt glue worked really well for me to secure the exact placement. |
 Four layers of fiberglass and two layers of carbon were laid over temporary weather stripping (3/8" wide and 3/16" thick) that had been filleted with silica-thickened epoxy. |
 A hatch stiffener was added to each hatch cover to prevent the hatches from warping. |
 The hatch rim has been trimmed. It has about 1.5" lip onto the deck. The visible part of the hatch rim has 1/4" of hard surface around the inside edge to keep the hatch flush, then the 3/8" weatherstrip groove, then 1/8" hard surface so the foam is not in the crack between the deck and hatch cover. |

This takes a lot of clamps, and return visits to wipe up the thickened epoxy that oozes out. |

Hip Plates |
 Side supports for the hip plates add strength and also provide a place to run a cable lock through to secure the boat. |
 Taping the deck and hull together on the inside is a messy job, but it begins to really look like a kayak now. |

It's a good thing not many people poke their heads into the hatches to see how neat the inside is. I bought some 3" fiberglass tape for the internal seam, but it wouldn't lay flat and wet-out clear, so I switched to 3" wide strips of bias-cut cloth. |
 The outside seam is masked off and then trimmed with a knife, so it's a lot neater. |
 What is it that attracts bugs to epoxy? Even in November! |
 It's looking more like a kayak now! |

|
Back to Page 1.
To my Home Page.
To my Paddling Home Page.
Created December 12, 2003