My first Guillemot kayak is such a pleasure to paddle
that I decided to a make a slightly smaller version. This kayak is 16
feet long and 20 inches wide. This is a good boat for me on casual day trips, and nice boat to lend to smaller paddling
friends. It is a very playful boat. Here are a few photos showing some of this kayak's
features:
[ Click any photo to see a larger image.
]

The
Finished Boat
After nearly 5 months of building
in my garage, this Guillemot S makes its maiden voyage on November 7,
2004.
|

My weight is a little over the optimal paddler weight of 140 pounds,
but it performs fine. Very playful.
|

The only modification I made to the
hull design was to add a little more pinched keel, or fixed skeg, to the
stern to improve tracking. Just a little bit, and I am very pleased
with the result.
|

A few days earlier, I took this kayak to a heated indoor
pool to test the hatch seals and position the seat. It
rolls as easy as I
expected.
|
|

Wood
All of the wood on the deck is western red cedar. I select lumber that has the
colors I want, and keep the strips from each board together to achieve
good color matching.
The wood strips are slightly under
1/4 inch (Approx. 0.22). This makes it a little lighter, and the
coves on the strips are less fragile when using a 1/4" diameter cove
router bit.
The wood is sheathed inside and out
with 6 ounce fiberglass e-cloth, with an extra 4 ounce layer on the hull
and abrasion patches on the stern and bow stems. The
final weight of this kayak is 35 pounds.
|

Cockpit
The cockpit rim is mahogany, unlike
a few of my earlier boats where I built carbon-epoxy rims.
The carbon rims are nice, but I thought that a wood rim on this boat would
look more consistent with the rest of the deck colors.
The shape of the cockpit opening
and hatches were borrowed from Redfish Kayaks' Spring Run kayak. I
prefer the Redfish cockpit shape because it achieves a very good sprayskirt
fit due to being well-rounded at every part of the rim.
My hatch opening shape is also
borrowed from the Redfish Spring Run. Its egg shape is very
practical.
|
 I I
Deck Rigging
The rigging in front of the cockpit
consists of two pairs of 1/4" shock cords. This is perfect for
holding a map or a water bottle. I find shock cords straight
across the deck more practical than a crossing pattern.
The idea for this deck design comes
from a photo of a boat I saw on the internet.
|

Cockpit Recess
The cockpit is recessed down enough
that the coaming rim is nearly on the same plane as the rear
deck. This makes reentry easier when sliding one's body forward from the rear
deck.
The cockpit rear was also
extended one inch farther towards the stern to allow better laybacks on the rear deck during
rolls. A cockpit recess also provides a firm place immediately
behind the rim for a paddle shaft to help stabilize the boat.
I almost never use the shock cords
behind the cockpit. My spare paddle fits inside the stern hatch on
day trips.
|

Hull
This simple pattern on the bottom
allowed me to use only two boards for the entire hull.
|


Hatches
Flush-mounted hatches produce no
deck spray when paddling into winds, and I find them visually appealing.
A pull-tab allows for easier
opening than a finger divot at the edge of the cover.
3/16 inch Shock cords hold the
hatch in place. The covers are always securely attached tot the boat,
so they won't be lost on a highway. The shock cords may not seem like
much of a hold-down to keep a water-tight seal, but they are surprisingly
water-tight.
The hooks that hold the shock cord
also serve as a hatch stiffener, to prevent any warping of the hatch
cover.
|

Bulkheads
The underside of the deck is outfitted with two pairs
of shock cords. These are used to secure a hand-pump, paddle-float
or small day bag.
The footbrace rails are attached to the hull with surfaced-mounted studs.
The bulkheads are 3mm plywood, fiberglassed with 4 ounce e-glass on the
hatch side.
|
|

Stripping
the Stern
My
preference for a well-performing Guillemot is to strip the hull with a few
strips down the keel line, to produce a well-defined pinched keel. The
strips conform to the shape of the hull better than if continuing stripping
parallel to the shear.
|

This
photo shows how I stripped the pinched keel, or fixed skeg. The keel line was extended approximately 3/4 inch deeper
(up, in this photo) than
the plans indicated towards the stern to improve tracking. Care was taken to ensure
a fair curve along the hull. I
am a big fan of using masking tape for stapleless
construction. I also use hot melt glue, drywall screws through little
blocks of plywood (see photo) and occasionally a heat gun to get the strips
to conform. Whatever it takes!
|

The finished stern profile maintains
the pretty lines of the Guillemot.
|

To achieve good color-matching for
'cheater strips' at the bow and stern, I run a strip a few feet past the end
of the boat, then use the run-off piece to make the cheater.
|

Paddle Park
This paddle park is a simple convenience.
|

Backrest
The backrest
attachments consist of a single webbing band connected to each
hip plate, a shock cord connecting the bottom of the backrest to the rear of
the coaming, and a nylon cord connecting the top of the backrest to the
coaming.
There is enough room behind the
backrest for a water bottle and a mesh bag that contains a few items such as
sunscreen.
|
 A
loop of 3/16 shock cord provides a convenient place to store a sponge.
It even holds it going down a highway at fast speeds with an open cockpit!
|

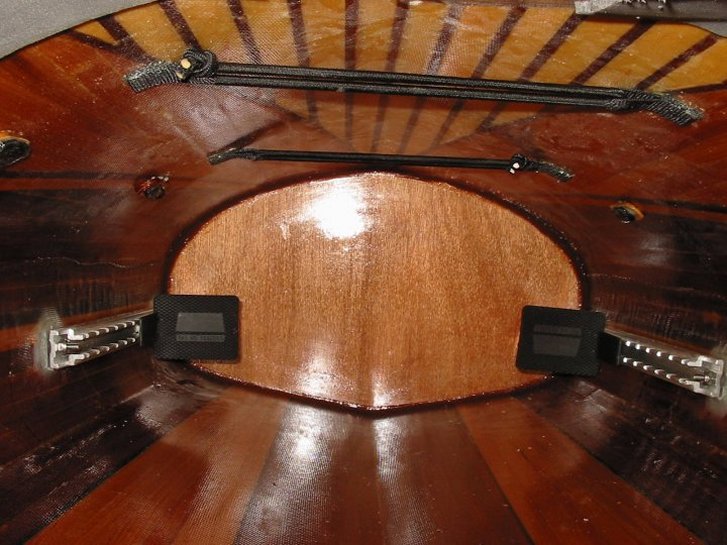
The hip plates have a horizontal brace attachment to the hull. This
adds strength and also creates a hollow area that a cable can pass through
to secure the boat.
|

|

|

The cars still fit inside the garage after this project, but it's getting
to be a tighter fit!
|


